


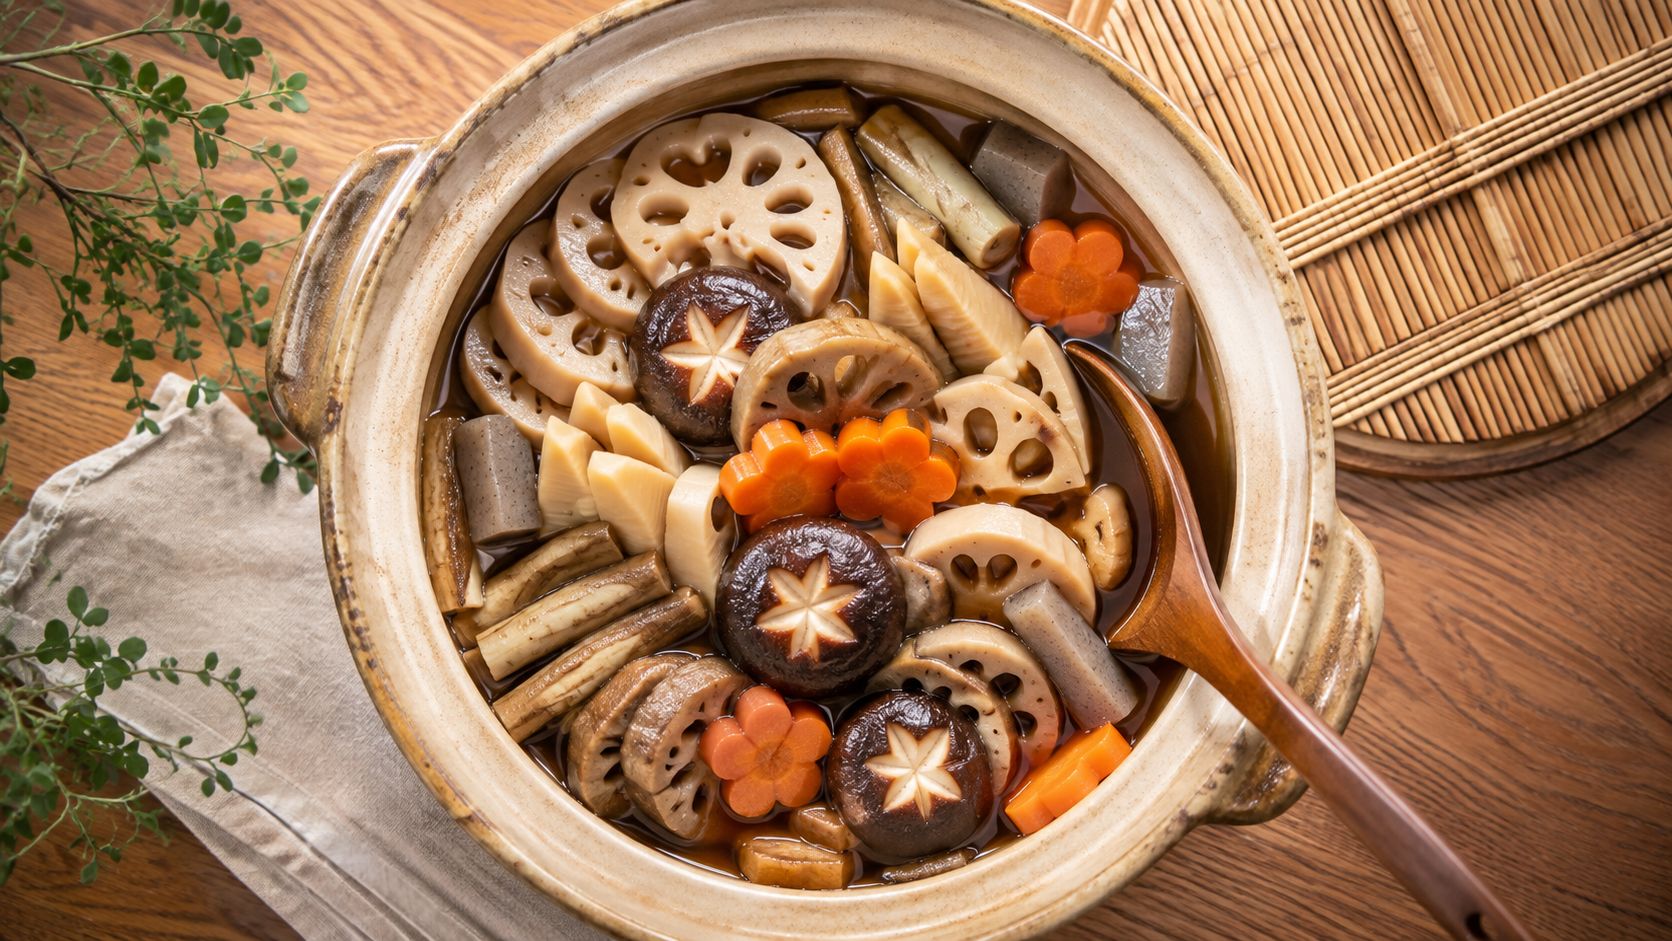
The first time I made nishime for a family meal, the pot looked simple and the timing felt almost too quiet. Then the vegetables came out glossy, seasoned, and still intact, which is exactly why this Japanese simmered dish has stayed in home kitchens for generations. If you've ever wanted a recipe for nishime that respects the tradition but also explains what makes it work, this guide lays out the ingredients, the layered simmering method, and the practical trade-offs between stovetop and pressure cooker cooking.
Nishime is the kind of dish that rewards patience, but not guesswork. The difference between a pot that tastes flat and one that tastes complete usually comes down to how each ingredient is treated before it meets the broth, how gently it simmers, and how long it rests after the heat is off.
What Makes Nishime a Cornerstone of Japanese Home Cooking
A good pot of nishime tells you a lot about Japanese home cooking without saying much at all. The name means “cooked slowly,” and that definition fits the dish perfectly. It belongs to the family of nimono, or simmered dishes, and it's traditionally built from root vegetables and other ingredients cooked in soy sauce and water almost to dryness, so the seasoning clings instead of pooling at the bottom.
That slow reduction is the point. One culinary reference places the dish among older Japanese home-cooking traditions, noting that “remonta a séculos atrás,” and that historical continuity shows up in the method itself, where flavor is absorbed without frying or heavy sauce. The dish is also strongly tied to celebratory meals, especially New Year's gatherings, where people want food that feels careful, composed, and festive rather than rushed.

The cultural idea behind the dish
The best way to understand nishime is to think of it as preservation-minded cooking that became celebratory cooking. The vegetables are simmered, not fried, and the broth is reduced until the seasoning settles into every surface. That gives the dish a clean, restrained finish that pairs naturally with rice and other New Year foods.
If you like the quiet discipline of Japanese cooking, think simply like Zen Buddhists is a useful lens here. Nishime isn't about excess. It's about attention, restraint, and ingredients that taste more like themselves after a slow simmer.
Gathering Your Ingredients and Pantry Essentials
A practical nishime shopping list starts with texture, not just flavor. The core vegetables usually include lotus root, gobo, carrots, shiitake mushrooms, konnyaku, taro or satoimo, bamboo shoots, and snow peas, and modern versions often work with about 6 to 10 ingredients. That mix gives you firm roots, tender mushrooms, and a fresh green garnish, which is what makes the finished plate feel balanced.
Build the pot by texture class
Hard roots need the most care, because they're the ingredients that can stay crunchy if you don't pre-treat them well. Lotus root, gobo, bamboo shoots, carrots, and taro all benefit from separate handling before they go into the pot. Softer ingredients like shiitake and snow peas sit at the other end of the spectrum, so they usually join later.
For the broth and seasoning, keep shoyu, mirin, sake, sugar, and kombu on hand. Choose a soy sauce with a clean, savory profile, and use kombu for a light dashi base rather than a heavy stock. If you're shopping internationally and comparing pantry items, a focused Japanese grocery source like Buy Me Japan's Japanese food shopping guide can help you match the right ingredients to the version you want to cook.
A few ingredient choices matter more than people expect.
- Lotus root: Look for slices with intact holes and firm flesh, because they hold shape and look good on the plate.
- Gobo: Use it for earthy depth, but prep it carefully so the flavor stays clean instead of muddy.
- Konnyaku: This adds chew and structure, so it's worth handling separately before simmering.
- Snow peas: Keep them bright and crisp by adding them at the end, not early.
- Kombu: Treat it as the quiet base note, not the main flavor.
- Shiitake: Dried mushrooms bring deeper savoriness than rushed fresh-only versions.
Practical rule: If an ingredient is dense, bitter, or oddly scented, it probably needs a separate pre-treatment step before it ever sees the main pot.
Pre-Treating Each Ingredient for Perfect Texture
The recipe for nishime stops being generic and starts tasting right. The most reliable workflow begins with separate treatment for ingredients by texture class, because kombu, dried shiitake, hard roots, and konnyaku all behave differently in the pot. If you put everything in raw and hope the simmer fixes it, you usually get uneven doneness and cloudy broth instead of a clean finish.
Separate the hard work from the soft work
Hydrate kombu and dried shiitake separately first. Kombu only needs a gentle soak, while dried shiitake should be rehydrated until the caps are fully pliable and the centers no longer feel leathery. That gives you a cleaner broth and mushrooms that stay tender instead of tasting stiff or woody.
For gobo and bamboo shoots, parboiling or blanching helps remove bitterness and any rough edge on the surface. A brief boil is enough to loosen off-flavors, then rinse and drain before layering them into the pot. Konnyaku should be briefly boiled too, just long enough to reduce its natural odor and help it absorb seasoning later.
Here's the useful part: pre-treatment isn't busywork, it controls how the final simmer behaves.
- Kombu: Soak until softened, then remove before the broth turns heavy.
- Dried shiitake: Rehydrate fully, then trim stems if they're tough.
- Gobo and bamboo shoots: Blanch briefly, then cool and drain well.
- Konnyaku: Boil briefly, then cut into shapes that can hold broth.
- Carrots, lotus root, and taro: Trim and cut after washing so you keep the cuts clean.
One detailed recipe also points out a practical category of ingredients often used in Japanese-American home cooking, and Oomoriya Furikake Strong Dried Ume 23g fits that broader pantry idea as a strong ume seasoning for rice, noodles, salads, or vegetables. It isn't part of traditional nishime itself, but it shows how Japanese flavor is often used as a finishing accent in the same kitchen.

The goal is simple, remove bitterness, remove odor, and keep every ingredient ready to cook at its own pace.
The Layered Simmering Method and Timing Guide
The pot matters as much as the ingredient list. Nishime depends on layered simmering, not a rolling boil, and the order in the pot protects each vegetable's shape. Dense vegetables belong lower, softer ones higher, and the broth should come only partway up so the ingredients braise instead of drift around in liquid.
Build the pot from the bottom up
Start with the most durable vegetables at the bottom of the pot, then arrange everything else by how long it needs to stay firm. One traditional method places squash on the bottom, then potatoes, carrots, and parsnips, with mushrooms on top, which follows the same idea even if the ingredient set changes. In a more classic nishime pot, chicken, kombu, mushrooms, and konnyaku often go in first, then lotus root, bamboo, burdock, and sweeter vegetables are added later so nothing turns mushy.
The broth should come up to about two-thirds of the vegetables, then the pot should be covered with an otoshibuta, or drop-lid, made from wood or parchment. Keep the simmer gentle. One reliable benchmark is to simmer covered for 45 to 60 minutes until daikon and taro are fork-tender and the broth has reduced by about one-third. Another modern home method uses staged intervals of about 15 minutes, then another 15 minutes, then a final 15 minutes, while a family-style approach uses 8 to 10 minute intervals before the vegetables cool in the liquid.
Do not stir aggressively.
Practical rule: Toss gently if you must, but don't stir the pot like a stew. Decorative cuts and soft roots break when they're moved too much.
Seasoning also works best in stages. Some home recipes begin with a gentle boil, skim impurities during the first stage, then lower to a quiet simmer. That keeps the broth clear and gives the vegetables time to take on flavor evenly without falling apart. Use sake and mirin, as outlined in this guide to Japanese rice wine cooking, when you want sweetness and depth to settle into the broth without making it flat.
If you cook with a wok or wide pan for other Japanese dishes, a solid pan choice such as the one discussed in Buy Me Japan's River Light wok guide helps show how vessel shape affects heat and reduction, even though nishime itself works better in a deep pot.
Resting matters too. Once the heat is off, let the pot sit 30 to 60 minutes so the vegetables reabsorb the broth. That resting time is where the flavor settles into place.
Traditional Stovetop vs Pressure Cooker Nishime
Traditional nishime and pressure-cooked nishime solve different problems. The stovetop version gives you more control over reduction, texture, and surface gloss, while the pressure cooker wins on speed. If you want the most classic finish, the slow simmer is still the standard. If you need a weeknight version, the pressure cooker makes sense.
A practical side-by-side comparison
| Factor | Traditional Stovetop | Instant Pot Pressure Cooker |
|---|---|---|
| Cooking style | Slow simmer with layered additions | High pressure workflow |
| Active time | Longer, with more monitoring | Much shorter once loaded |
| Texture | Cleaner reduction, more control over softness | Faster softening, less gradual control |
| Best for | Ceremonial meals and fuller broth reduction | Busy cooks who want the flavor profile faster |
| Trade-off | Needs resting and attention | May not match the same glossy finish |
A recent pressure-cooker version shows how fast the method can move, using HIGH pressure for 3 minutes after adding carrot, konnyaku, and shiitake mushrooms. That's a real convenience gain for anyone who wants nishime flavor without a long stovetop session. A useful reference on pressure-cooker technique, Everti pressure cooker help, can also help readers think through appliance timing and safety in general.
The trade-off is texture. The pressure cooker softens ingredients quickly, which is good for firm roots, but the broth usually won't reduce as gradually as it does on the stove. That means the stovetop still has the edge when you want a more concentrated, glossy finish and sharper control over each vegetable's shape.
For the vegetables themselves, hard roots and konnyaku cope well with pressure. Delicate snow peas and any garnish should stay out of the pressure stage. If your priority is a holiday table, stovetop is the safer bet. If your priority is getting dinner on the table with less work, pressure cooking is the better compromise.
If you like cooking Japanese rice and one-pot meals with the same kind of practical approach, the product notes around Kokuho Rose rice are a useful reminder that texture and grain quality matter just as much as seasoning in a finished meal.
Regional Variations and Seasoning Approaches
Nishime isn't one fixed formula. It's a family of related simmered dishes, and the differences are real enough that cooks should stop treating one recipe as the only authentic version. One regional source contrasts Kanto-style sugar with Kansai-style mirin, while Hawaii's Japanese-American tradition often adds chicken and turns the dish into a more presentation-focused New Year plate. That spread tells you something important, authenticity depends on context, not rigidity.
Why the seasoning changes from place to place
A Chikuzenni variant from the former Chikuzen Province, now part of Fukuoka Prefecture, is a useful example because it has a documented regional origin and is now enjoyed throughout Japan. The Ministry of Agriculture, Forestry and Fisheries also lists a simmered dried daikon version under “Our Regional Cuisines,” which shows that nishime sits inside a broader heritage of local simmered dishes rather than one standardized menu item.
Seasoning is where the differences show up most clearly. Some versions lean harder on sugar, others on mirin, and many use shoyu with staged additions rather than a fixed ratio. That's why experienced cooks taste as they go and adjust with small additions of soy sauce or dashi instead of overloading the pot at the start. A soy-forward simmer can work beautifully, but only if the broth stays balanced and the vegetables still taste like vegetables.
For a contrasting example of how seasoning is approached in Japanese sauces, a focused condiment like sashimi soy sauce guidance shows how different soy profiles are chosen for different jobs. Nishime uses the same principle, just in simmered form.
Authenticity isn't one frozen recipe. It's a set of regional habits, family habits, and ingredient choices that all make sense in their own kitchen.
Serving, Storing, and Troubleshooting Your Nishime
Nishime looks best when you respect the plate as much as the pot. A traditional New Year presentation places the vegetables in separate decorative mounds instead of mixing them into one heap, then garnishes with snow peas and serves the dish at room temperature as a side. That keeps the shapes visible and gives the meal a more ceremonial feel.

Storage is straightforward if you don't rush it. Cool the pot first, then refrigerate the vegetables with enough broth to keep them from drying out. Reheat gently over low heat so the broth doesn't boil hard and break the vegetables you worked to keep intact.
Common problems and quick fixes
- Mushy vegetables: This usually comes from stirring too much or loading the pot with everything at once. Next time, layer by texture and leave the pot alone.
- Under-seasoned broth: If you add all the seasoning early and stop tasting, the final dish can fall flat. Add soy sauce or dashi in small increments instead.
- Cloudy broth: Vigorous boiling is the usual cause. Keep the simmer low and skim early if needed.
- Dry pot: Too much reduction can happen if the lid sits wrong or the heat runs too high. Add a little broth and keep the simmer gentle.
A quiet reminder from Japanese home cooking applies here, taste before you correct. The best nishime usually comes from small adjustments, not dramatic ones. For cooks who like to keep a Japanese pantry stocked with rice, seasonings, and everyday ingredients, the broader grocery selection at Buy Me Japan makes it easier to source authentic items alongside the recipe work.
If you want to cook nishime the way families serve it, shop for authentic Japanese pantry items, compare regional ingredients, and build the pot with care. Visit Buy Me Japan to browse Japanese food products that fit this style of cooking, then bring home the shoyu, mirin, kombu, and pantry staples that make a proper simmered dish easier to repeat.


Share:
Charcoal Mask Benefits: Japanese Skincare Science
Barrier Repair Skincare Routine: Soothe & Restore 2026