You’re looking at your nose in the mirror, turning your face side to side, and wondering why every nose contour tutorial seems made for a sharper, narrower tip than yours. That’s a common frustration. A bulbous nose needs more precision, less product, and a softer finish than most dramatic contour routines suggest.
The good news is that Japanese makeup philosophy is especially effective here. Instead of carving harsh stripes into the face, it focuses on controlled shadow, diffused edges, and skin-like texture. If you want to learn how to contour bulbous nose shapes so they look naturally refined in daylight, selfies, and real life, the technique matters as much as the product.
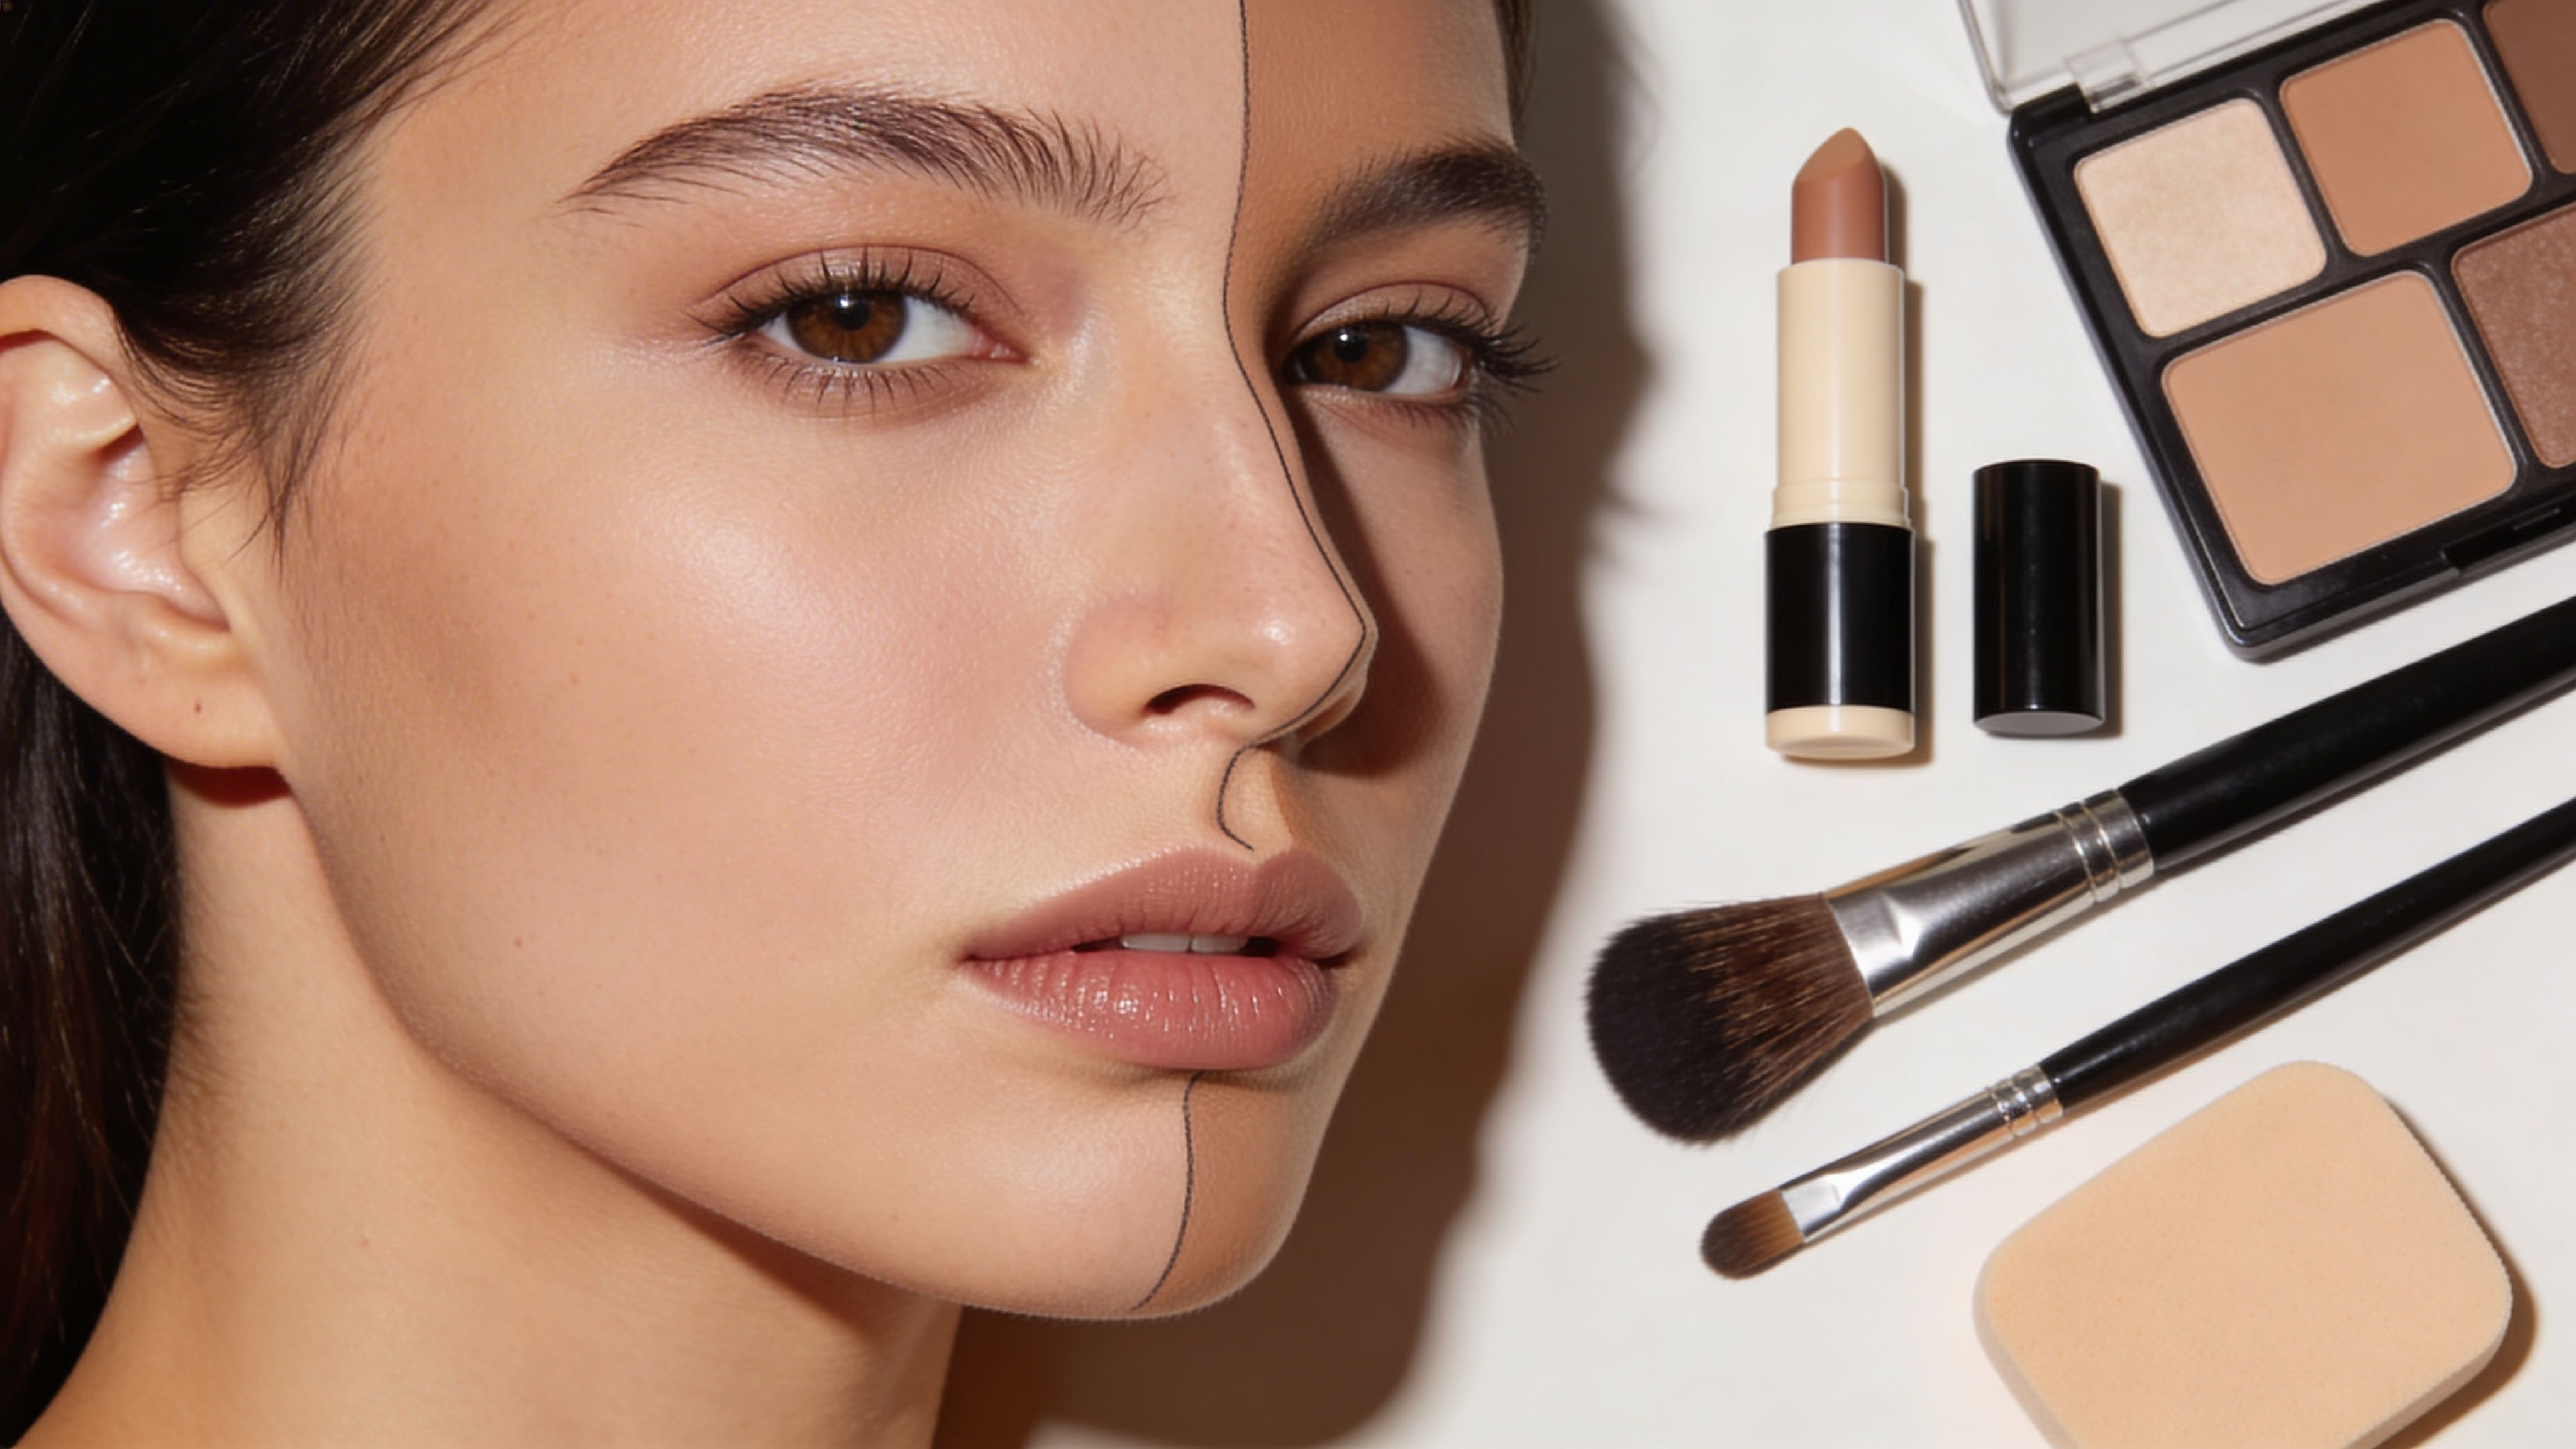
Understanding Your Tools and Choosing Your Products
A bulbous nose contour works by redirecting the eye. You’re not trying to make the entire nose disappear. You’re creating the impression of a narrower bridge and a more defined tip through matte shadow placement and a restrained central highlight.
For ideal proportions, makeup artists often follow nasal analysis standards where the nasolabial angle is 100-105 degrees for women, and contouring aims to visually replicate refined balance rather than change anatomy outright, as outlined in this nasal analysis guide.

Choose texture based on skin, not trends
A lot of people start with whatever bronzer they already own. That’s the first mistake.
If your skin is oily, a soft powder contour is easier to control and less likely to slide around the tip. Japanese powders are finely milled, which helps them sit closer to the skin instead of looking dusty. This matters on the nose, where every edge is visible.
If your skin is dry, textured, or mature, cream products look more believable because they move with the skin. They also tend to avoid that chalky ring that can collect around the nostrils.
A quick rule:
- Powder contour: Better for oily skin, humid weather, and fast touch-ups
- Cream contour: Better for dry skin, close-up photography, and a softer finish
- Hybrid method: Cream for shape, powder for setting if you need more longevity
The right shade matters more than the brand name
For a bulbous tip, the contour shade should mimic a natural shadow. That means cool-toned and matte. Not orange. Not red-brown. Not shimmery.
Japanese brands do this well because the finish is subtle. Products from brands like Canmake, Cezanne, and Kate are popular for a reason. They tend to give a quieter, more skin-real effect than many heavy sculpting palettes.
Practical rule: If the shade looks like a soft shadow on your jaw or eye socket, it will work better on the nose than a warm bronzer.
Your brushes should be smaller than you think
A bulbous nose doesn’t need broad strokes. It needs controlled placement.
Keep these tools on hand:
- Small angled brush: Best for drawing the initial side lines cleanly
- Tiny detail brush: Useful for shaping the tip contour without flooding the nostril area
- Soft fluffy blender: Helps soften edges without removing the structure
- Damp sponge: Best for pressing cream products into the skin
The width of your brush changes the result. If the brush is too large, your contour line spreads before you even blend it.
Finish is the secret
The classic Japanese makeup approach is less about obvious sculpting and more about refined surface quality. That means smooth base makeup, low-shine contour, and a controlled highlight that doesn’t flash white in photos.
If your foundation is too dewy, the contour can slip. If it’s too matte and heavy, the nose can look flat. A balanced base makes the contour believable. If you want to improve that foundation layer first, this guide to Japanese makeup foundation is worth reviewing.
The Step-by-Step Guide to Contouring Your Nose
Most bulbous nose contour fails for one reason. People contour the bridge and forget the tip shape. On this nose type, the tip is the whole story.

Expert makeup artist Wayne Goss’s method is still one of the most practical references for this shape. It uses two parallel lines placed about 0.5cm apart down the bridge and a small V shape over the nostril area to visually compress width. That approach reported 85-90% user satisfaction for natural-looking results in this Wayne Goss contour breakdown.
Prep the skin properly
Start with light hydration. You want slip, but not a greasy surface.
Then apply a thin base. Heavy foundation makes nose contour harder because product stacks around the nostrils and breaks apart during blending. A lighter Japanese base or cushion gives better control.
If your tools are fighting you, your brush may be the issue more than the makeup. A useful reference is this guide to the best Japanese makeup brushes.
Map the bridge first
Use a small angled brush and a cool matte contour shade.
Follow this order:
- Start near the inner brow area Place the first mark high enough that the contour connects naturally to the eye area.
- Draw two slim parallel lines Keep them close. For this nose shape, wide spacing makes the nose look broader, not slimmer.
- Keep the pressure lighter as you move down The bridge should look structured, not boxed in.
- Stop before the widest part of the tip Don’t drag those lines all the way down in one thick stroke. That exaggerates roundness.
Place the contour where you want the eye to read depth, not where the nose naturally casts its heaviest shadow.
Shape the tip with intention
This step changes the whole result.
On a bulbous tip, place a small V or soft triangle over the rounded lower area of the nose. The point should aim toward the center base of the nose. The sides should sit just enough to visually pull the tip inward.
Think of it as framing the tip rather than coloring it in.
A clean approach:
- Keep the shape small: Large triangles look theatrical
- Focus on the outer roundness: That’s what you’re trying to visually compress
- Leave some center space: If you darken the entire tip, it can look muddy
Add a narrow highlight
The highlight shouldn’t be frosty or glittery. It should be subtle and controlled.
Apply a thin line down the center of the bridge. Keep it narrower than the space between your contour lines. If you widen the highlight too much, you undo the slimming effect.
Avoid placing a bright blob on the tip. For a bulbous nose, too much light at the end brings attention right back to the area you wanted to refine.
Here’s a visual walkthrough if you want to compare hand placement and brush angle while practicing:
Check from three angles
Don’t judge the result solely from straight on. Look at your nose:
- Front view: Are the lines slim and balanced?
- Three-quarter view: Does the tip still look softly refined?
- Side view: Is the highlight too strong or the contour too visible?
That final check is what makes the contour wearable. A technique can look perfect in a mirror and obvious on camera if the side edges aren’t controlled.
Mastering the Art of Effortless Blending and Setting
You finish the contour, step back from the mirror, and the nose suddenly looks striped instead of refined. That usually means the placement was fine, but the blending was too broad or the setting step was too heavy.
For a bulbous nose, blending should reduce contrast without expanding the shape. Japanese nose contour works best when the shadow stays tight, the finish stays soft, and the skin still looks like skin.
How to blend without losing precision
Use the tool that matches the texture you applied.
Cream contour responds best to a damp sponge or a small dense brush. Press lightly along the outer edge of the contour and keep the center line clean. If you drag across the bridge, the shadow spreads inward and the nose reads wider.
Powder contour is easier to control with a small fluffy brush. Sweep only at the outer border, then stop and check. The inner edge needs a little definition or the slimming effect disappears on camera and in daylight.
A quick guide:
| Method | Best for | What to avoid |
|---|---|---|
| Damp sponge pressing | Cream contour, dry skin, natural finish | Rubbing across the bridge |
| Small fluffy brush | Powder contour, oily skin, soft diffusion | Large circular buffing over the whole nose |
| Fingertip warming | Tiny corrections at the tip | Smearing product downward |
One professional rule matters here. Blend the edge, not the placement.
Why too much blending makes the nose look rounder
A bulbous tip already has softness and width. If the contour is overworked, you blur the very edges that create visual restraint. The result is a nose that looks flatter at the center and fuller at the tip.
This is one of the clearest differences between many Western contour tutorials and Japanese makeup philosophy. The Western approach often pushes stronger contrast and sharper carving. Japanese techniques usually aim for a quieter correction that holds up in daylight, phone photos, and close conversation. Texture and finish matter as much as color.
If you want that same balanced effect across the rest of the face, this guide to makeup techniques for Asian eyes that keep features soft and harmonious pairs well with subtle nose contour.
Set with a light hand
Heavy powder can age the nose area fast. It also makes contour sit on top of the skin, which defeats the natural, your-face-but-better result.
Use a finely milled translucent powder and press it on only where cream products tend to shift. A product like Canmake Marshmallow Finish Powder works well because the finish stays smooth rather than chalky. I usually use a small puff around the sides of the nose, then a clean brush to soften any excess.
If your skin is dry or textured, set less than you think you need. If your skin gets oily through the day, focus powder near the nostrils and sidewalls instead of covering the entire bridge.
For readers comparing makeup contour with in-office options, Dermal Fillers offer a different route, but makeup remains the safer choice for testing shape changes before committing to anything structural.
For a broader look at this softer J-beauty approach, Japanese makeup tutorial secrets to effortless J-beauty shows the same preference for controlled placement, thin layers, and a natural finish.
Do one last check in neutral light. If the first thing you notice is makeup, soften the edge. If the first thing you notice is a cleaner nose shape, the blend is right.
Advanced Customizations for Your Unique Face
The base technique stays the same, but placement should shift with your features. A slightly rounded tip, a very full tip, and mature skin don’t respond equally to the same product weight.

Adjust the contour to the degree of roundness
If your nose is only softly rounded, keep the bridge lines delicate and make the tip shape minimal. Too much structure can create a pinched or artificial effect.
If the tip is more prominent, increase definition at the lower sidewalls instead of darkening the whole front of the nose. That preserves realism. The eye reads edge shadow faster than a dark patch in the center.
Face shape matters too:
- Round face: Keep the nose contour slim and pair it with gentle cheek definition so the center of the face doesn’t look isolated
- Oval face: Most balanced for nose contour, so subtle placement reads best
- Square face: Slightly softer blending helps the nose sit naturally with stronger bone structure
For readers who like balancing the whole face, not just one feature, this article on makeup for Asian eyes is useful because harmony around the eyes changes how strong the nose contour needs to be.
Mature skin needs a different strategy
Many tutorials fail in this regard. They assume smooth, taut skin and recommend powder-heavy sculpting that can settle around texture.
For mature skin, hydrating Japanese base products and cushion formulas work better because they leave a softer surface. According to the assigned reference, Japanese cushion compacts such as those from Hada Labo or Kose Visee can refine bulbous tips 25% more effectively on mature skin without settling into fine lines, thanks to soft-focus formulas discussed in this mature skin contouring video.
That doesn’t mean more glow is always better. It means the skin should look cushioned, not greasy.
A better mature-skin routine usually looks like this:
- Hydrate first: Dryness makes contour catch on texture
- Use cream or cushion formulas: They sit more naturally than dry powders
- Skip heavy tip highlight: Shine can exaggerate uneven texture
- Set selectively: Usually at the nostril crease and sides, not the entire nose
On mature skin, softness reads as refinement. Hard edges read as makeup.
Know when makeup is the right tool
Contouring can create a strong visual improvement, but it’s still an optical technique. It changes perception, not anatomy.
Some readers explore temporary aesthetic treatments as well, especially when they want support beyond makeup. If that’s part of your research, this overview of Dermal Fillers gives useful context on non-surgical facial balancing. It’s helpful to understand where makeup ends and procedural options begin, even if your daily solution remains cosmetic.
The most flattering result usually comes from restraint. Precision on a bulbous nose doesn’t mean stronger lines. It means smarter placement, softer textures, and a result that fits the rest of your face.
Common Contouring Mistakes to Avoid
The fastest way to improve your nose contour is to stop copying techniques that work against this nose shape. A bulbous tip doesn’t respond well to drama for drama’s sake.

According to expert analysis, common pitfalls include excessive blending, which causes flatness in 65% of cases discussed in the referenced tutorial context, using the wrong undertone which fails on 50% of certain skin tones, and applying product too heavily. Those issues are outlined in this advanced contour technique video.
Mistakes that make the nose look wider
A few common errors:
- Lines placed too far apart: This broadens the bridge
- Warm bronzer instead of cool contour: Orange tones don’t create believable shadow
- Too much product on the tip: Heavy darkness turns into a blotch, not definition
- Shimmer on areas you want to reduce: Light brings volume forward
A lot of people also over-highlight the end of the nose because it looks cute in some trends. On a bulbous tip, that usually does the opposite of what you want.
What to do instead
Use a tighter contour map and a lighter hand. Build slowly.
If you’re not sure whether your base product is contributing to the problem, it helps to understand the finish difference between complexion products. This explanation of what is BB cream vs CC cream can help you choose a base that doesn’t make the nose look heavy before contour even begins.
Try this correction guide:
| Mistake | Why it fails | Better fix |
|---|---|---|
| Thick dark stripes | Reads as obvious makeup | Sketch thin lines, then build if needed |
| Shimmery bronzer | Adds attention and texture | Use matte, cool-toned contour |
| Full-tip highlighting | Emphasizes roundness | Keep highlight narrow and mainly on the bridge |
| Over-blending | Removes structure and creates flatness | Blend edges only, not the whole shape |
A natural nose contour should register as better proportions, not stronger makeup.
Your Path to a Perfectly Contoured Nose
A convincing bulbous nose contour comes down to three things. Shade choice, placement, and restraint. If any one of those is off, the whole effect can turn obvious quickly.
The Japanese approach works so well because it respects real skin. Instead of forcing a sculpted, high-contrast finish, it relies on fine texture, controlled matte shadow, and blending that stays invisible at conversational distance. That’s exactly what a bulbous nose needs.
If you’re practicing how to contour bulbous nose shapes for everyday wear, don’t chase the most dramatic result on the first try. Aim for the result that looks best in natural light, from the side, and without a filter. That’s the one people read as elegant.
It’s also useful to keep perspective. Makeup is excellent for visual refinement, but some people eventually want a permanent structural change. If you’re comparing cosmetic techniques with medical procedures, this overview of surgical nose reshaping options offers a clear starting point for understanding what surgery addresses that makeup cannot.
The best contour doesn’t erase your features. It edits them lightly, so your face still looks like you. Just more balanced, more polished, and more intentional.
If you want authentic Japanese contour products, base makeup, cushions, powders, and brushes that suit this softer technique, explore Buy Me Japan. It’s a practical place to shop Japanese beauty staples directly from Japan, especially if you want trusted brands and the subtle finishes that make nose contour look natural instead of obvious.

Share:
Cleansing Oil Kose: Ultimate J-Beauty Guide 2026
A Practical Substitute for Sake in Any Recipe