Już wykonałaś staranną część. Twoja pielęgnacja jest odpowiednio nałożona, produkty bazowe pasują do twojej skóry, a pędzle do makijażu były na tyle drogie, że oczekujesz od nich dobrego działania. A potem pewnego ranka podkład ciągnie, róż robi plamy, albo skóra nagle jest podrażniona w miejscach, które zwykle są spokojne.
W praktyce problem często nie leży w formule. Leży w narzędziu.
W japońskiej kulturze urody narzędzia nie są traktowane jako jednorazowe dodatki. Są częścią rzemiosła. To samo podejście, które ceni delikatne oczyszczanie, precyzyjną aplikację i codzienną pielęgnację, dotyczy także czyszczenia pędzli do makijażu. Dobrze utrzymany pędzel nie tylko dłużej służy. Nakłada produkt bardziej równomiernie, lepiej się czuje na skórze i dosłownie utrzymuje twoją rutynę w czystości.
Ukryty powód, dla którego twój makijaż nie jest nieskazitelny
Pędzel może wyglądać na zewnątrz na akceptowalny, a mimo to źle działać.
Szczególnie dotyczy to podkładu, korektora, kremowego różu i baz z dużą ilością filtrów przeciwsłonecznych. Produkt gromadzi się głęboko w środku włosia, blisko nasady, gdzie pigment, olej i resztki skóry utrzymują się długo po tym, jak widoczna powierzchnia wygląda na czystą. Efekt pojawia się na twarzy zanim widać go na pędzlu. Smugi, matowe rozcieranie, zanieczyszczony kolor i lekko szorstkie uczucie na skórze to zwykle wczesne ostrzeżenia.
Japońska technika makijażu ceni cienkie, kontrolowane warstwy. Gdy narzędzie jest zanieczyszczone, precyzja znika. Czysty pędzel rozprasza produkt. Brudny ciągnie.
Najczęściej widzę to, gdy ktoś zakłada, że jego produkt do cery przestał działać. Zmienia podkład, próbuje nowej bazy, a nawet przemyśla całą rutynę przygotowawczą. Ale gdy pędzle są odpowiednio umyte i wysuszone, te same produkty często zachowują się tak, jak powinny od początku. Jeśli twoja rutyna już obejmuje staranne oczyszczanie, logika jest taka sama jak w podwójnym oczyszczaniu dla równowagi i klarowności skóry. Czystość powierzchniowa i głęboka to nie to samo.
Czyszczenie skóry brudnymi pędzlami to nierówny system. Jedna część rutyny ciągle poprawia to, co druga część wprowadza na nowo.
Jest też bardziej praktyczny powód, by potraktować to poważnie. Pędzel naładowany starym produktem bazowym staje się sztywniejszy i mniej responsywny. Przestaje reagować na lekki nacisk, na którym opiera się japońska technika makijażu, szczególnie wokół nosa, pod oczami i na teksturowanych obszarach, gdzie liczy się precyzja.
Czyszczenie pędzli do makijażu działa najlepiej, gdy przestaniesz traktować to jako obowiązek. To konserwacja narzędzi. A jeśli zależy Ci na wykończeniu, higienie i zachowaniu dobrych pędzli, zasługuje to na taką samą uwagę, jaką poświęcasz samym formułom.
Podstawy higieny pędzli do makijażu
Higiena pędzli zaczyna się od prostego rytmu. Część czyszczenia jest lekka i częsta. Inna musi być dokładna i zaplanowana.
Solidną podstawę stanowią zalecenia dermatologiczne. Amerykańska Akademia Dermatologii zaleca mycie pędzli do makijażu co 7 do 10 dni, ponieważ pozostałości i bakterie mogą szybko gromadzić się na narzędziach mających kontakt z twarzą. Ta sama wskazówka zauważa też realną lukę w zachowaniach, gdyż 44% konsumentów nigdy nie myło swoich pędzli do makijażu, według cytowanego w artykule wskaźnika branżowego w tym samym źródle na temat jak często czyścić pędzle do makijażu i jak je prawidłowo suszyć.
Które pędzle wymagają najściślejszego harmonogramu
Nie każdy pędzel brudzi się w ten sam sposób.
Pędzle do podkładu i korektora wymagają największej dyscypliny, ponieważ pracują z płynnymi i kremowymi teksturami, które łatwo zatrzymują olej i pozostałości. Gęste syntetyczne pędzle również dobrze ukrywają nagromadzenia, więc często wyglądają na czystsze niż są w rzeczywistości. Pędzle do pudru są bardziej wyrozumiałe, ale i tak zbierają oleje skórne, kurz z otoczenia i stary pigment z czasem.
Praktyczny sposób myślenia o tym jest taki:
- Pędzle do produktów płynnych i kremowych wymagają regularnego głębokiego mycia, ponieważ zatrzymują pozostałości blisko podstawy.
- Pędzle do oczu wymagają częstego czyszczenia powierzchni, jeśli często zmieniasz odcienie.
- Pędzle do pudru mogą czasem wytrzymać dłużej, ale tylko jeśli są używane wyłącznie do suchych produktów i przechowywane w czystości.
Codzienne czyszczenie kontra głębokie czyszczenie
Ludzie często mylą te dwie rzeczy.
Codzienne czyszczenie służy wydajności. Głębokie czyszczenie – higienie i długowieczności pędzla.
Krótka porównawcza pomoc:
| Metoda | Najlepsze do | Co usuwa | Co pomija |
|---|---|---|---|
| Szybkie czyszczenie powierzchni | Między odcieniami, w podróży, szybkie poprawki | Widoczny pigment na zewnątrz | Nagromadzenie głębiej w rdzeniu pędzla |
| Głębokie mycie | Regularna higiena i przywracanie wydajności pędzla | Pozostałości na powierzchni, nagromadzenie wewnętrzne, oleje | Wymaga więcej czasu i miejsca do suszenia |
To rozróżnienie ma znaczenie nie tylko w kwestii urody. Jeśli kiedykolwiek czytałeś o różnicy między sprzątaniem powierzchni a pełną ochroną przestrzeni przed wirusami poprzez odpowiednie czyszczenie a dezynfekcją, ta sama zasada tutaj obowiązuje. Usuwanie tego, co widać, jest przydatne, ale nie jest tym samym co dokładne oczyszczenie narzędzia.
Oczyszczacz też ma znaczenie
Działające agresywnie środki mogą pozostawić włosie szorstkie lub kruche, zwłaszcza w przypadku miękkich pędzli z naturalnego włosia. Łagodne środki na bazie mydła są zwykle bezpieczniejsze do regularnej pielęgnacji, dlatego wiele osób preferujących proste rutyny dobrze radzi sobie z delikatnymi kostkami do mycia. Logika jest podobna do wyboru dobrze sformułowanego japońskiego mydła w kostce dla niskiego podrażnienia. Chcesz wystarczającej mocy czyszczącej, by usunąć oleje i pigment, nie wysuszając i nie łamiąc narzędzia.
Praktyczna zasada: Jeśli środek czyszczący byłby zbyt silny dla delikatnej skóry lub cienkich włosów, zwykle jest zbyt agresywny dla pędzla, który chcesz utrzymać w doskonałym stanie.
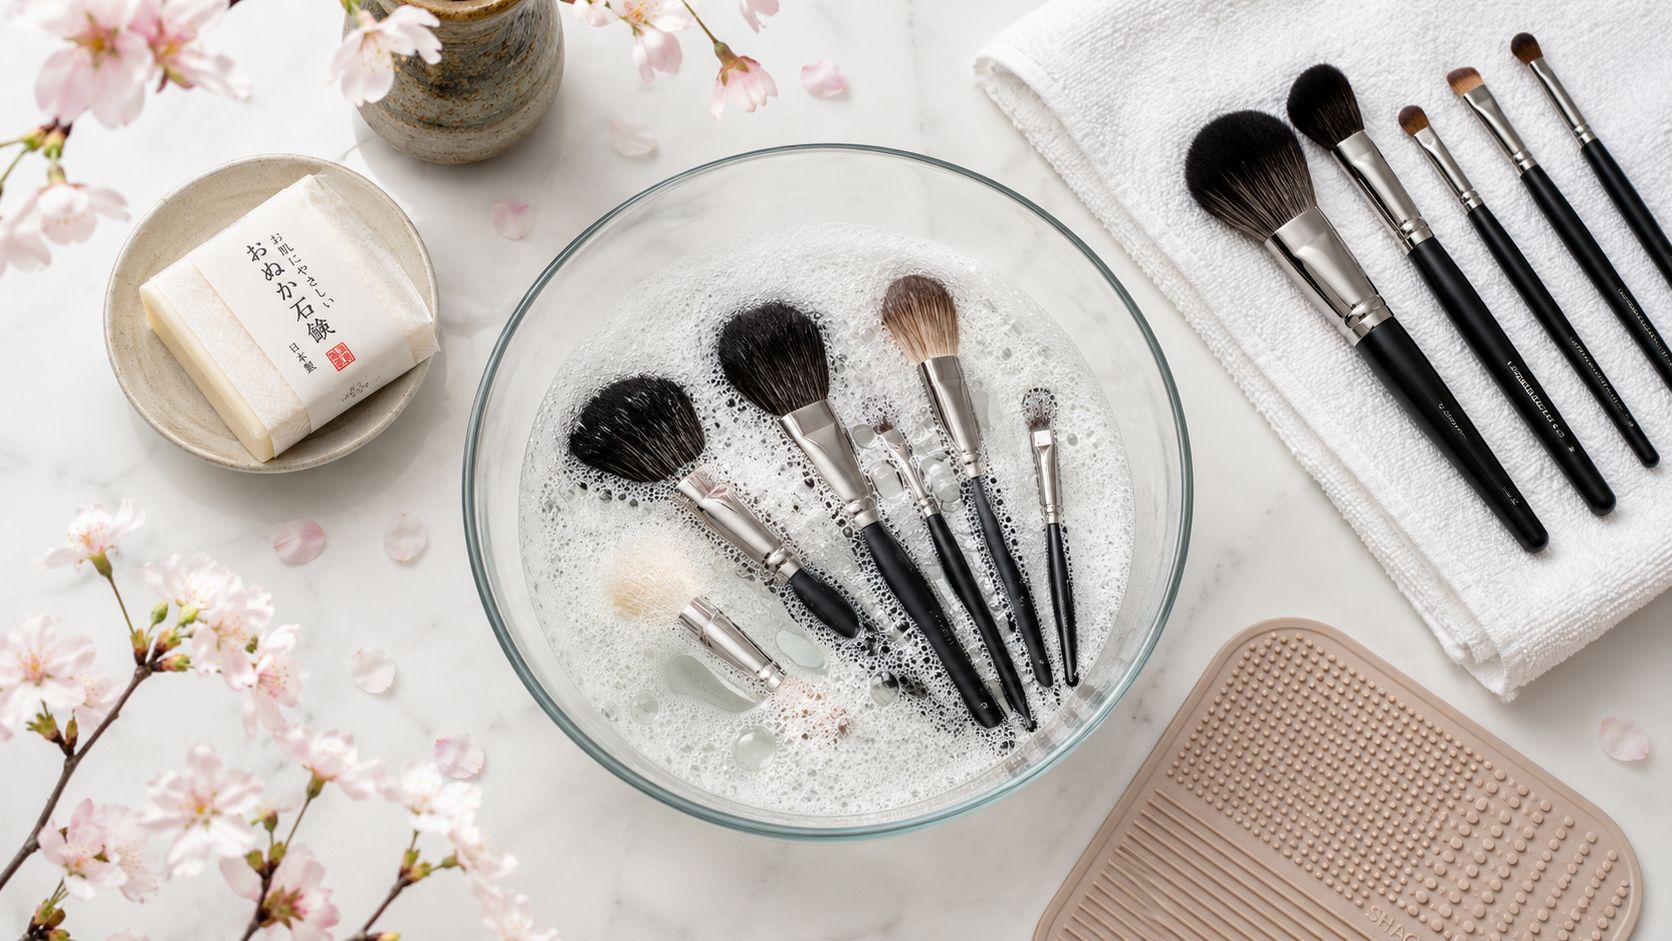
Twój krok po kroku rytuał głębokiego czyszczenia
Właściwe głębokie mycie powinno być spokojne i metodyczne. Pośpiech prowadzi do półczystego włosia, nasiąkniętych łączeń i uszkodzonych kształtów.

Wybierz środek czyszczący, który usuwa pozostałości, nie niszcząc włosia
Dla większości pędzli dobrze sprawdza się delikatny szampon do pędzli lub łagodny szampon dla dzieci. Jeśli wolisz podejście w stylu japońskiej pielęgnacji skóry, łagodny środek do mycia twarzy lub mydło z czystym spłukiwaniem również mogą działać, pod warunkiem, że nie pozostawiają ciężkiej warstwy. Kluczem nie jest piana dla samej piany. Środek czyszczący musi rozpuścić tłuste, bogate w pigment pozostałości i jednocześnie całkowicie się spłukać.
Niektórzy artyści stosują także olejki oczyszczające jako krok wstępny na uporczywych pędzlach bazowych, zwłaszcza do produktów długotrwałych, a następnie wykonują właściwe mycie. Myślenie jest podobne do metody opisanej w recenzjach DHC Deep Cleansing Oil i rozkładzie makijażu na bazie oleju, gdzie olej skuteczniej rozpuszcza uporczywy makijaż niż samo wodne przetarcie.
Zwilżaj tylko końcówki
Trzymaj pędzel skierowany w dół i spłukuj tylko końcówki włosia pod letnią wodą.
To jest ważniejsze, niż ludzie myślą. Woda nie powinna zalewać metalowego łączenia ani wnikać do rączki. Najbezpieczniejszą techniką jest kontrolowane, płytkie zwilżanie. Zwilż włosie na tyle, by móc pracować z środkiem czyszczącym, ale nie tak bardzo, by pędzel stał się nasiąknięty wodą u podstawy.
Pracuj pianą wystarczająco długo, aby miało to znaczenie
Wiele rutyn tutaj zawodzi. Szybkie zakręcenie i spłukanie to nie jest głębokie czyszczenie.
Eksperckie standardy wskazują, że amfifilowe środki powierzchniowo czynne w szamponie do pędzli lub szamponie dla dzieci wymagają minimalnego czasu kontaktu 2 do 3 minut z aktywnym spienianiem, aby prawidłowo rozpuścić hydrofobowe pozostałości, a ten sam źródło zauważa, że głębokie czyszczenie może osiągnąć 95% redukcję obciążenia mikrobiologicznego, podczas gdy czyszczenie punktowe osiąga tylko 40 do 50% w porównaniu, jak podsumowano w tej dyskusji na temat standardów czyszczenia pędzli.
Użyj dłoni, teksturowanej silikonowej maty lub płytkiej miseczki. Delikatnie kręć, lekko dociskaj i pozwól, by środek czyszczący przeszedł przez całą główkę pędzla.
Prosta sekwencja działa dobrze:
- Zwilż włosie pod letnią wodą.
- Nałóż niewielką ilość środka czyszczącego na dłoń lub matę.
- Delikatnie kręć i pieniaj przez cały czas kontaktu.
- Zwróć uwagę na środek pędzla, gdzie ukrywa się produkt.
- Spłukuj i powtarzaj, jeśli piana jest nadal widocznie zabarwiona.
Jeśli również dbasz o narzędzia do włosów, ten sam nawyk powolnego, metodycznego usuwania resztek obowiązuje w tym poradniku czyszczenia szczotek do włosów, choć pędzle do makijażu wymagają delikatniejszej ręki przy skuwce.
Spłukuj, aż woda będzie prawdziwa
Etap spłukiwania powinien trwać, aż woda będzie czysta, a włosie nie będzie już puszczać piany.
Ten punkt o „czystej wodzie” jest ważny, bo wymaga cierpliwości. Wiele pędzli wydaje się czystych, zanim naprawdę są. Gęste pędzle do podkładu często potrzebują drugiego mycia. Pędzle do oczu używane z kremowymi cieniami też mogą wymagać więcej niż jednego przejścia.
Pokaz wideo może pomóc, jeśli chcesz dokładniej przyjrzeć się pozycji dłoni i kątowi spłukiwania.
Uformuj ponownie przed suszeniem
Po spłukaniu delikatnie wyciśnij nadmiar wody czystym ręcznikiem. Nie skręcaj. Nie zgniataj włosia w ciasny uchwyt.
Zamiast tego:
- Dociskaj, nie wykręcaj, aby wewnętrzna struktura zachowała kształt.
- Uformuj końcówkę z powrotem palcami, gdy pędzel jest jeszcze wilgotny.
- Oddziel wszelkie zlepione partie przed odłożeniem pędzla do wyschnięcia.
Pędzel powinien schnąć w kształcie, w jakim chcesz go użyć następnego dnia. Jeśli wyschnie zgięty lub rozdzielony, ten kształt zwykle się utrzymuje.
To etap, w którym głęboko wyczyszczony pędzel zaczyna przypominać odnowione narzędzie, a nie tylko umyty przedmiot.
Codzienna pielęgnacja pędzli w podróży
Głębokie czyszczenie dba o higienę. Codzienna pielęgnacja zapewnia wygodę.
Nowoczesne rutyny czyszczenia pędzli często bywają nieporządne. Ludzie albo zbytnio polegają na szybkim spryskiwaniu i zakładają, że pędzel jest całkowicie czysty, albo pomijają jakąkolwiek pielęgnację między użyciami i pozwalają, by produkt się nagromadził, aż dzień mycia stanie się nieprzyjemny. Lepszym podejściem jest dopasowanie metody do sytuacji.

Do czego naprawdę przydaje się szybkie czyszczenie
W dziedzinie porad dotyczących urody brakuje naprawdę ważnych informacji. Szybkie metody czyszczenia dla osób często używających pędzli, podróżujących i zmieniających odcienie w ciągu dnia są nadal słabo wyjaśnione. Rzadko kiedy porównuje się praktycznie środki do spryskiwania, wodę micelarną i podobne metody, choć właśnie tego ludzie potrzebują, gdy zmieniają produkty lub pakują się lekko.
Szybkie czyszczenie jest najlepsze dla:
- Zmiany cieni do powiek, gdy chcesz zmienić odcień bez mieszania kolorów
- Dni podróży, gdy mycie przy zlewie nie jest możliwe
- Konserwacja w środku tygodnia, by utrzymać pędzle w użyteczności między dokładnymi myciami
- Profesjonalne lub intensywne rutyny, gdzie ten sam pędzel używany jest do kilku produktów w ciągu dnia
Jeśli pracujesz z precyzyjnym nakładaniem cieni, zwłaszcza miękkimi gradientami, utrzymanie pędzli z lekkim pigmentem między odcieniami pomaga też zachować efekt opisany w technikach makijażu dla azjatyckich oczu i kontrolowanego nakładania koloru.
Porównanie głównych opcji
Nie wszystkie szybkie metody działają tak samo.
| Metoda | Najlepsze zastosowanie | Zalety | Ograniczenia |
|---|---|---|---|
| Spray czyszczący i ręcznik | Szybkie usuwanie pigmentu | Szybko schnie, wygodne w podróży | Głównie powierzchniowe działanie |
| Woda micelarna na ściereczce | Lekki codzienny osad | Delikatne i łatwe do kontrolowania | Mogą pozostawić wilgoć |
| Chusteczki | Tylko na nagłe wypadki | Wygodne w torebce | Łatwo przesadzić z wilgocią lub zostawić resztki |
| Sucha mikrofibra do przecierania | Pędzle do pudru między odcieniami | Bez potrzeby użycia płynu | Ograniczona moc czyszczenia |
Spraye czyszczące są najskuteczniejsze przy pracy z cieniami do powiek. Kilka psiknięć na włosie, a potem mocne przetarcie czystym ręcznikiem lub mikrofibrą zwykle usuwa wystarczająco dużo koloru, by zachować prawdziwe odcienie. Woda micelarna może się sprawdzić przy pędzlach syntetycznych w nagłych wypadkach, ale działa wolniej i może pozostawić wilgotne wykończenie, które opóźnia ponowne użycie.
Chusteczki to najmniej elegancka opcja. Są przydatne, gdy nie masz nic innego, ale często spłaszczają główkę pędzla i mogą sprzyjać szorstkiemu traktowaniu.
Do szybkiej konserwacji najlepszym narzędziem jest często czysty ręcznik i umiar. Zbyt dużo płynu zamienia szybkie odświeżenie w niedosuszone mini-pranie.
Japońskie podejście do przenośnej pielęgnacji
Japoński design kosmetyczny preferuje kompaktowe, mało brudzące rozwiązania. Takie podejście świetnie sprawdza się w pielęgnacji pędzli. Małe buteleczki ze sprayem, mikrofibrowe ściereczki składane w etui i smukłe ochraniacze na pędzle to zestawy, które są używane, bo pasują do codziennego życia.
Na szybkie pielęgnacje w podróży polecam minimalną rutynę:
- Jeden spray czyszczący do usuwania pigmentu
- Jeden miękki ręcznik przeznaczony wyłącznie do pędzli
- Jedna osłonka lub ochraniacz na pędzel dla ochrony kształtu po użyciu
To nie zastąpi prawdziwego czyszczenia pędzli do makijażu. Utrzyma Twoje narzędzia w porządku między myciami, co często decyduje o płynności rutyny lub jej chaotycznym przebiegu.
Zaawansowane rozwiązania do suszenia i przechowywania
Czysty pędzel może zostać zniszczony po umyciu.
Suszenie to moment, w którym wiele dobrych rutyn zawodzi. Włosie może być nieskazitelne, ale jeśli woda dostanie się do skuwki i rączki, pędzel zaczyna słabnąć od środka. Wypadanie włosia, chwianie się i odkształcenia główki często zaczynają się właśnie tutaj.

Trzymaj wodę z dala od skuwki
To najważniejsza zasada mechaniczna w całym procesie.
Krytycznym technicznym błędem jest zanurzanie skuwki w wodzie, co wiąże się z 40 do 60% wzrostem degradacji kleju i wypadania włosia w ciągu 6 miesięcy, a dermatolodzy zalecają zwilżanie tylko końcówek pędzla, aby chronić integralność kleju.
Jeśli kiedykolwiek zastanawiałeś się, dlaczego piękny kiedyś pędzel nagle zaczyna gubić włosie, często jest to właśnie powód. Uszkodzenia nie zawsze widać po pierwszym myciu. Gromadzą się z czasem.
Właściwa pozycja do suszenia
Wiele osób stawia pędzle pionowo w kubku zaraz po myciu, bo wygląda to schludnie. To jedna z najgorszych rzeczy, jakie można zrobić.
Woda podąża za grawitacją. Jeśli pędzel stoi włosiem do góry, gdy jest wilgotny, wilgoć może spływać w dół do skuwki i osłabiać to, co trzyma główkę razem.
Najbezpieczniejsze opcje to:
- Położone płasko na ręczniku, z główką pędzla lekko wystającą poza krawędź powierzchni
- Ustawione skośnie w suszarce, aby wilgoć odprowadzała się od rączki
- Rozstawione, aby powietrze mogło swobodnie krążyć wokół każdego pędzla
Gęsty pędzel schnie dłużej niż puszysty pędzel do pudru. Nie upychaj ich razem. Jeśli przepływ powietrza jest słaby, środek może pozostać wilgotny długo po wyschnięciu zewnętrznej warstwy.
Ciepło nie jest skrótem
Suszarki do włosów wydają się wygodne, ale często zaburzają kształt włosia i zbyt szybko suszą zewnętrzną warstwę. Pędzel może wydawać się suchy, zanim jego wnętrze całkowicie wyschnie, co niweczy cel.
Cierpliwe suszenie na powietrzu daje lepszy efekt. Uformuj pędzel, gdy jest wilgotny, a potem zostaw go w spokoju. Japońskie rzemiosło ceni powściągliwość zamiast siły, a pielęgnacja pędzli podąża tą samą logiką. Pozwól materiałowi wrócić do formy.
Przechowuj tylko całkowicie suche pędzle. Czysty pędzel schowany wilgotny może nabrać nieprzyjemnego zapachu, stracić kształt i zniweczyć starania włożone w jego mycie.
Przechowywanie, które zachowuje efekt pielęgnacji
Po wyschnięciu przechowywanie powinno chronić kształt i ograniczać kontakt z kurzem.
Praktyczne ustawienie wygląda tak:
| Styl przechowywania | Najlepsze do | Zwróć uwagę na |
|---|---|---|
| Otwarty stojak | Codzienne użycie suchych pędzli | Trzymaj z dala od powierzchni pełnych kurzu |
| Rolka na pędzle | Przechowywanie na podróż lub w miejscach o niskim zapyleniu | Upewnij się, że pędzle są całkowicie suche |
| Organizer do szuflady | Duże kolekcje | Unikaj zgniatania puszystych główek |
Dobre przechowywanie to cicha pielęgnacja. Nie wydaje się dramatyczne, ale pozwala dłużej utrzymać czyste pędzle w czystości oraz zachować miękkość i precyzję, które udało Ci się przywrócić.
Typowe błędy w czyszczeniu i japońskie innowacje
Najczęstsze błędy w czyszczeniu pędzli wynikają zwykle z dobrych intencji, ale wykonywanych zbyt agresywnie.
People soak brushes because they want them very clean. They use harsh soap because they want product gone fast. They scrub hard because pigment looks stubborn. Each choice feels efficient in the moment, but the brush pays for it later.
In a reported test of 35 makeup brushes, 58% had high levels of bacteria and 34% had dangerously high levels, showing how serious neglected hygiene can become in ordinary consumer tools, according to this report on bacterial contamination in dirty makeup brushes.

Habits that damage brushes
A few mistakes show up constantly:
- Soaking the whole brush weakens the internal structure where the bristles are fixed.
- Using strong household cleansers can leave bristles dry, rough, and harder to control.
- Drying upright while wet sends moisture into the wrong part of the brush.
- Assuming wipes equal washing creates a false sense of cleanliness.
Even DIY trends can go wrong when they're too abrasive. The same caution applies when experimenting with homemade cleansers or rough alkaline mixtures. If you're curious about strong household cleaning ingredients, it's worth understanding how differently they behave compared with personal care cleansers, including something as basic as baking soda soap and its cleansing profile.
Where Japanese beauty thinking stands out
Japanese innovation in beauty tools tends to offer understated solutions to problems. Better brush care doesn't have to mean more force. It usually means better textures, gentler cleansers, and smarter storage.
That's why Japanese routines often feel so disciplined without becoming harsh. A mild cleanser that rinses clean, a compact drying setup, a travel-friendly cloth, or a thoughtfully shaped cleaning mat all reflect the same principle. Respect the tool, and it will return precision.
Czyszczenie pędzli do makijażu jest najlepsze, gdy staje się częścią całego rytuału pielęgnacyjnego. Nie jest to dodatek na ostatnią chwilę ani panikowanie i szybkie mycie przy pojawieniu się wyprysków. To standardowa pielęgnacja, wykonana prawidłowo.
Jeśli chcesz autentyczne japońskie produkty kosmetyczne i starannie wyselekcjonowane codzienne niezbędniki wysyłane bezpośrednio z Japonii, Buy Me Japan to praktyczne miejsce na zakupy. Jest szczególnie przydatne, jeśli budujesz bardziej przemyślaną rutynę wokół japońskiej pielęgnacji skóry, makijażu i pielęgnacji narzędzi, i zależy Ci na produktach pochodzących z autentycznych źródeł i poddanych kontroli jakości.
Udział:
Odcienie szminek dla chłodnych tonów skóry – Twój idealny przewodnik
Czym jest Cica w pielęgnacji skóry? Korzyści i najlepsze produkty 2026